The weather is cooling, the bees are slowing. Though we’re wrapping up the growing season, it’s time to think about next year and the spiral of years to come. One of my favorite parts of this autumnal winding-down time is the container it provides. We reflect on what passed and imagine what is yet to be: a nurturing future rich in medicine, food, and flowers. It’s a wonderful time to save seeds, put the garden to bed, and inoculate mushroom logs!
Growing your own mushrooms via plug spawn log inoculation is a fun, relatively easy, and mostly hands-off approach. It’s a great way to provide yourself and your community with fresh, locally grown mushrooms. Even if you only have a tiny outdoor area to work with, log-grown mushrooms don’t take up a ton of space. For those of you with no access to outdoor space, I recommend using a box/bag mushroom grow kit or checking out your community garden to see if they’d like to foster some logs. Logs inoculated in the fall tend to fruit after about 9 months – 1 year, depending on environmental factors.
Make Your Own Mushroom Log!
Materials
To start, you’ll need hardwood logs, plug spawn, a drill & 5/16ths bit, a mallet or hammer, and beeswax or paraffin wax.
Step 1 – Gather your logs
The hardwood logs (white oak, red oak, poplar, maple, birch, beech, etc.) should be at least 4-6 inches in diameter and 2+ feet in length. They can be bigger, just keep in mind you will have to move them around and manipulate them a bit. Avoid evergreens, conifers (fir, cedar, pine, etc.), and walnut, black locust, and fruit trees. Logs should be somewhat recently cut; don’t use logs that have been outside for longer than a month. (2)
Before inoculating, I recommend soaking logs for several days – a week to ready them. I use a kiddie pool, but you can soak them with a hose and wrap them in wet burlap, too.
Step 2 – Source your plug spawn
I usually purchase my plug spawn from reputable, small mushroom farms in my area. This year, I’m using North Spore’s (located in Maine) Shiitake and Lion’s Mane plug spawn. You can also make your own plug spawn by inoculating sterilized hardwood dowels with mushroom mycelium. Any hardwood-loving species can be grown on logs, including Shiitake, Oysters, Reishi, Lion’s Mane, Chicken of the Woods, Maitake.

Step 3 – Drill holes
Drill holes all over the log, approximately 4” apart. Use a drill bit that is about the same size as your plug spawn, usually a 5/16th bit works. Some folks say forming a “diamond” pattern is best, but I don’t think it really matters, as long as there are a good number of holes evenly spaced.
The holes should be about 1 ¼” deep, or just deep enough to fully take in the plug so it is flush with the log. You may need to clear the sawdust and woodchips from the holes to make room for the plugs. This is the most labor-intensive part, and much more comfortable to do on a table or some kind of workbench.
Step 4 – Inoculate the log
Inoculate the log by pounding the dowels into the holes with the mallet. You want the fit tight, enough that you can’t just pop the plugin by hand. This part is fun and somewhat satisfying!
Step 5 – Seal the plugs with wax
Next, melt a small amount of beeswax until spreadable, usually, a few spoonfuls are enough to cover 4-5 logs. Now it’s time to cover the plugs with wax to prevent the plugs from drying out or getting overtaken by other opportunistic fungi. Using something like a paintbrush or a popsicle stick, spread the wax over the plugs!
Some growers like to cover the top and bottom of the log with wax to seal in moisture, but it’s not necessary and I’d only recommend it if you live in a very dry climate.
Step 6 – Strategically place the logs
Once inoculated, find a shady, relatively moist spot for the logs to colonize. You can stack them or stand them under a tree or against a wall. Use shade cloth or burlap to make shade if there isn’t any. Really, you want to make sure that they don’t get blasted with direct sunlight, and stay relatively moist. It’s ideal if they recieve rainfall, or are at least hosed down every once in a while. It’s important to put the log somewhere easy to see! Your mushrooms can appear suddenly without warning, and you want to catch them in their prime.
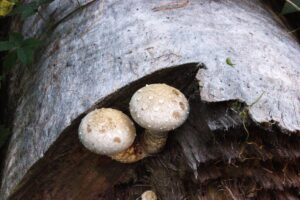
When the logs are fully colonized and the weather conditions are right, the mushrooms should fruit from the log, ready to harvest and enjoy. With some care, each log should produce around 2 pounds of mushrooms over its lifetime (up to 5-6 years), but uncontrollable factors such as rainfall, temperature, and humidity levels can affect yields.
Step 7 (optional) – Initiate a flush
If the mushrooms haven’t fruited after a year or so, you can shock them to initiate a flush. Do this by knocking one end of the log sharply onto the hard ground or with a mallet. Then, immerse the log in cool or cold water for a day or so. Make sure the water is non-chlorinated. If using tap water, leave to stand overnight or use rainwater. Then, put the log in a sheltered, shady spot and lightly cover it with plastic to increase humidity. The log should start fruiting within 1-3 weeks, forming in ‘flushes.’ Remove the plastic once fruiting has started. (1)
Step 8 – Harvest your mushrooms!
Harvest your mushrooms by cutting them at the base of the stem, rather than picking them off the log. In general, you’ll want to cut the mushrooms off the log when the cap is 3-4 inches across, after 4-8 days of growing (they grow faster in warm weather).

Step 9 – Rest your logs
After harvesting your mushrooms, leave your log outside in a damp place for four to six weeks to rest, then soak the log in cool, unchlorinated water again to start a second fruiting.
Sources
- Shields, Tony. “HOW TO GROW MUSHROOMS ON LOGS AND STUMPS WITH PLUG SPAWN” https://learn.freshcap.com/growing/mushroom-plugs-log-cultivation/
- North Spore “Grow Mushrooms on Logs Walkthrough” https://northspore.com/pages/grow-mushrooms-on-logs-videos